
Quick Answer
If your basement passes a moisture test (MVER under 3 lbs per 1,000 sq ft per 24 hours via ASTM F1869, or internal RH under 75% via ASTM F2170) and the slab is flat to within 3/16 inch over a 10-foot span, rigid core LVP with an integrated moisture barrier is the strongest all-around choice for a finished basement. It survives minor flooding events, installs faster than tile, and tolerates the temperature swings a basement slab produces.
If you are building a utility space, workshop, or garage-adjacent area where you want zero organic material on the floor and maximum chemical resistance, 100% solids epoxy coating is the right call, provided you have confirmed there is no active hydrostatic pressure problem under the slab.
If you need a permanent, hard-surface finish that handles radiant heat well and you are willing to invest the prep time and labor cost, porcelain tile is the most durable long-term option, though it will be the coldest underfoot without an in-floor heating system.
Table of Contents
- The Core Problem: Concrete and Moisture
- Before You Pick a Floor: The Two Tests You Cannot Skip
- Subfloor Prep: What Contractors Get Wrong
- Material Comparison Matrix
- LVP with Integrated Moisture Barrier: The Full Picture
- Epoxy Coatings: The Full Picture
- Ceramic and Porcelain Tile: The Full Picture
- Definitive Recommendation Framework
The Core Problem: Concrete and Moisture
A basement concrete slab is not a static object. It is a porous structure sitting below grade, continuously interacting with the ground moisture around and beneath it. Even a slab that looks and feels dry is almost certainly emitting moisture vapor upward through a process called moisture vapor transmission (MVT). That invisible vapor is the single largest cause of basement flooring failure across all three material categories covered in this post.
The mechanism matters because it changes how you solve the problem. There are two distinct moisture conditions:
Moisture vapor emission is the slow, continuous upward migration of water vapor through the pores of the concrete. This is normal. Every concrete slab does it. The question is whether the rate exceeds what your chosen flooring can tolerate.
Hydrostatic pressure is fundamentally different. This is liquid water or high-pressure vapor being driven upward through the slab by a water source beneath it: a high water table, poor exterior drainage, or foundation grading that directs water toward the building rather than away from it. Hydrostatic pressure is not a flooring problem. It is a water intrusion problem, and attempting to solve it with flooring materials alone will fail regardless of what you install.
Contractor Warning: If you see white chalky deposits (efflorescence) on your concrete, wet patches that reappear after the surface dries, or dark staining around the perimeter after rain events, you likely have hydrostatic pressure or active water intrusion. Do not install any floor covering until this is diagnosed and corrected at the source. No coating, barrier, or LVP product will hold against pressurized water moving upward through the slab.
Before You Pick a Floor: The Two Tests You Cannot Skip
Skipping moisture testing in a basement is the single most common reason basement flooring fails within 12 to 24 months of installation. Both tests below can be done by a homeowner.
Test 1: ASTM F1869 (Calcium Chloride Test)
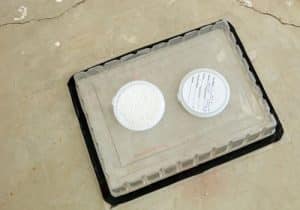
ASTM F1869 measures the moisture vapor emission rate (MVER) at the surface of the slab. You place a sealed dome containing anhydrous calcium chloride on the bare concrete, leave it for 60 to 72 hours, and measure the weight gain of the crystals. Results are reported in pounds of moisture per 1,000 square feet per 24 hours.
Thresholds:
- Under 3 lbs: Acceptable for most resilient flooring and epoxy systems per ASTM F710
- 3 to 5 lbs: Marginal. Some premium LVP products with enhanced moisture tolerances may permit installation; verify against the specific manufacturer spec
- Over 5 lbs: Do not install. Investigate the source and remediate first
Testing protocol: ASTM F1869 requires 3 test kits for the first 1,000 sq ft and 1 additional kit per each additional 1,000 sq ft. Ambient conditions must be held between 65°F and 85°F at 40% to 60% relative humidity for 48 hours before and during the test period, mirroring normal occupied conditions.
Test 2: ASTM F2170 (In-Situ Relative Humidity Probe)
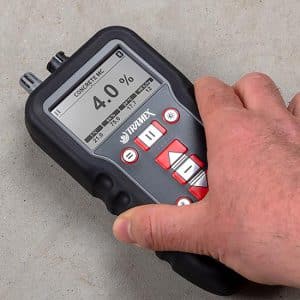
The calcium chloride test only measures moisture at the top 1/4 to 1/2 inch of the slab. The RH probe test drills into the slab at 40% of its depth (for a slab drying from one side, as most basements are) and measures internal humidity. This is now the preferred protocol among most flooring manufacturers and adhesive companies.
Threshold: Internal slab RH must be at or below 75% for most flooring systems, per ASTM F710. Some manufacturers allow up to 80% or 85% depending on the specific product.
Best Practice: Run both tests. The calcium chloride test shows what the surface is doing right now; the RH probe shows what is happening deeper in the slab, which is a more accurate predictor of long-term conditions once flooring traps vapor at the surface.
Subfloor Prep: What Contractors Get Wrong
Flatness Tolerance
Per ASTM F710, the concrete subfloor must not deviate more than 3/16 inch over a 10-foot span for rigid core LVP, LVT, and glue-down vinyl installations. For click-lock rigid core products, this is a mechanical requirement: planks that bridge a dip or hump will flex under foot traffic and fracture the locking joint. A snapped click-lock joint cannot be repaired in place; the surrounding planks must be pulled and replaced.
Check flatness with a 10-foot straightedge laid in multiple directions across the room. Mark all high spots and low spots with chalk.
Correcting high spots: Mechanically grind down with a diamond cup wheel. This generates respirable silica dust; a HEPA-filtered vacuum attached to the grinder shroud and an N95 respirator are not optional.
Correcting low spots: Apply self-leveling underlayment (SLU) or a portland cement-based patching compound.
Contractor Warning: Never use a gypsum-based patching compound or gypsum-based self-leveling underlayment in a below-grade application. Gypsum is water-soluble. In a basement environment with any moisture vapor movement, a gypsum compound will soften, swell, and cause the flooring above it to buckle or telegraph the failure through the surface. Use only portland cement-based products for any below-grade subfloor work.
After applying any leveling compound, re-run the moisture tests before proceeding. The water introduced by the compound temporarily raises slab moisture content, and you need a passing result before putting floor covering down.
Concrete Compressive Strength
Concrete must have a minimum compressive strength of 3,000 PSI before installing resilient flooring. Soft, crumbling, or dusting concrete will not hold an adhesive bond. If the surface powders when you drag a nail across it, that is concrete laitance, and it must be ground off before any floor covering goes down.
The Porosity Check
Before applying any adhesive or coating, drop a 1-inch diameter bead of water directly on the bare concrete surface. If it does not absorb within 60 to 90 seconds, the surface has a sealer, curing compound, or contamination layer on it that will block adhesive bonding. This residue must be mechanically removed.
Material Comparison
| Category | LVP (Rigid Core + Moisture Barrier) | Epoxy Coating | Porcelain Tile |
|---|---|---|---|
| Flood Survivability | High. Waterproof core survives standing water if removed within 24 to 48 hours. Subfloor must dry before reinstallation. | Moderate. The coating itself is waterproof, but active flooding can force water under the coating through cracks or edges, causing delamination. | Highest. Tile and grout survive full submersion. Failure risk is at the grout and substrate level if flooding is prolonged and subfloor loses bond. |
| Warmth Underfoot | Moderate. Rigid core adds slight thermal break over bare concrete. Remains warmer than tile at ambient basement temperatures. | Cold. The coating is a thin film directly on the slab. No thermal resistance. | Cold. Porcelain has high thermal conductivity. At typical basement temps (55°F to 65°F), tile is noticeably cold without in-floor heat. |
| Installation Speed | Fast. A competent DIY installer can float a 400 sq ft basement in one day after subfloor prep is complete. | Moderate. Surface prep (grinding, profiling) is labor-intensive. Epoxy requires 24-hour recoat windows between primer, base coat, and topcoat. Full system typically 3 to 5 days. | Slow. Tile layout, setting, and grouting in a 400 sq ft basement is typically a 3 to 4 day project for a professional crew, longer for DIY. |
| Moisture Tolerance | High, if product includes integrated barrier. MVER limit is typically 3 to 8 lbs depending on manufacturer spec. | Conditional. Moisture-tolerant epoxy systems handle vapor up to 5 lbs MVER with standard primers, up to 12 to 18 lbs with a dedicated moisture vapor barrier primer. Fails catastrophically under true hydrostatic pressure. | High. Porcelain is impervious to moisture. Failure risk is in the thinset and grout, not the tile. Use polymer-modified thinset and epoxy or unsanded grout in wet-prone joints. |
| Cost (Material + Labor, Installed) | $3 to $7 per sq ft material; $2 to $4 per sq ft labor. Total: $5 to $11 per sq ft. | $3 to $12 per sq ft depending on system grade and number of coats. Labor varies widely based on prep requirements. | $4 to $15 per sq ft material (porcelain); $5 to $12 per sq ft labor. Total: $9 to $27 per sq ft. |
| Failure State | Click-lock joint fracture from subfloor flatness violations; mold under attached pad if high moisture is trapped; gapping from temperature swings outside the 55°F to 85°F service range. | Blistering and delamination from hydrostatic pressure or moisture vapor exceeding product tolerance; peeling from inadequate surface profile or skipped primer. | Cracked tile or hollow (de-bonded) tile from slab movement; grout degradation from ongoing moisture cycling; tent cracking in large-format tile if expansion joints are omitted. |
LVP with Integrated Moisture Barrier: The Full Picture
What “Waterproof LVP” Actually Means
The waterproof claim on LVP packaging refers to the core material, typically a rigid PVC or SPC (stone polymer composite) core that will not swell, warp, or delaminate when it gets wet the way wood-based products do. The flooring itself will not be damaged by water sitting on its surface. What the packaging does not tell you is that moisture coming from below, through the slab, is a different problem entirely.
An LVP plank with an attached foam or felt pad can trap moisture between the pad and the concrete. In a basement where the slab is continuously emitting vapor, that trapped moisture creates a warm, dark, humid environment that grows mold. The mold does not always destroy the flooring visually; it grows in the backing and underneath, and you find it when you pull the floor up years later.
The mitigation: Specify LVP with a fully integrated, attached moisture barrier backing rather than a foam or felt pad. Alternatively, install a separate 6-mil polyethylene vapor barrier sheet across the entire slab before floating the LVP over it. The sheet should be lapped 8 inches at seams and taped, with the edges running up the wall behind the baseboard. On slabs that read between 75% and 85% RH or between 3 and 5 lbs MVER, the separate vapor barrier is not optional.
Wear Layer Specification
Do not buy on price alone without checking the wear layer. The wear layer is the clear protective film over the printed design layer, and its thickness in mils determines durability.
- 6 to 12 mil: Light residential. Adequate for a low-traffic basement bedroom.
- 20 mil: Heavy residential or light commercial. This is the minimum spec for a basement that will see regular foot traffic, furniture movement, or any commercial-adjacent use.
- 28 mil and above: Commercial. Warranted for rolling loads in most cases.
For a basement used as a living space, media room, or home gym, specify a minimum 20-mil wear layer. A 12-mil floor under a home gym will show scratches from equipment feet within six months.
Temperature Service Range
Most rigid core LVP is rated for a permanent service temperature between 55°F and 85°F. Below 55°F, the PVC core can become brittle and the locking joints become more susceptible to fracture under foot traffic. If you are installing in an unconditioned or partially conditioned basement and the space regularly drops below 55°F in winter, confirm the product’s rated temperature range before purchase.
The Failure State in Detail
The failure mode most contractors do not explain upfront: if the slab is not flat to within the 3/16-inch-over-10-foot tolerance, rigid core LVP will begin to telegraph that unevenness immediately after installation, and the locking joints over the high spots will fracture as foot traffic flexes the plank across the hump. Unlike a floating wood floor, once a rigid SPC locking joint cracks, that plank cannot be repaired. It must be replaced, which means pulling back all planks from the nearest wall to reach the damaged one.
Epoxy Coatings: The Full Picture
System Grades Matter Enormously
The box-store two-part epoxy kit bears almost no resemblance to a professionally installed 100% solids epoxy system in terms of performance or longevity. The two primary differences are solids content and film thickness.
- Water-based epoxy paint: 40% to 50% solids, typical dry film thickness of 3 to 4 mils. These are decorative coatings. They will chip, peel, and show wear in 2 to 5 years under normal traffic.
- Solvent-based 100% solids epoxy: Full solids content, dry film thickness of 8 to 15 mils per coat. Multi-coat systems (primer, base coat, broadcast aggregate, sealer/topcoat) can achieve 20 to 30 mils total. This is a structural coating with 10 to 20 year performance expectations under proper conditions.
The Hydrostatic Pressure Failure Mode
This is the failure state that destroys epoxy floors in basements and that most contractors either do not disclose or genuinely do not test for thoroughly enough.
Concrete is porous. When there is a water source below the slab, water vapor migrates upward through the pores. An epoxy coating is essentially impermeable once cured. When that vapor reaches the underside of the coating and cannot escape, pressure builds between the coating and the concrete. That pressure eventually exceeds the adhesive bond strength of the epoxy-to-concrete interface and lifts the coating off the slab in blisters or sheets. This can happen to a professionally installed, properly mixed, properly applied epoxy system on a slab that passed a basic moisture test, because calcium chloride tests only measure the top quarter-inch of the slab and may not detect moisture conditions deeper in the concrete or driven by a seasonal water table shift.
Signs that your basement has a hydrostatic pressure issue before you coat:
- Efflorescence (white chalky salt deposits) anywhere on the slab
- Dark staining or wet patches that return within 48 hours after the surface is dried
- Dampness or dripping at wall-to-floor joints after rain events
- Any prior coating or adhesive that has blistered or peeled without a clear cause
Contractor Warning: A moisture-tolerant epoxy primer is not a solution to active hydrostatic pressure. It extends the threshold at which vapor emission causes failure, typically from 3 lbs to 5 to 8 lbs MVER depending on the system. A dedicated moisture vapor barrier primer can push that threshold to 12 to 18 lbs MVER. But if there is true hydrostatic pressure, meaning pressurized liquid water moving through the slab, the correct solution is an interior drainage system (perimeter drain channel and sump pump) or exterior waterproofing. No coating system is warranted against structural water intrusion.
Surface Preparation Requirements
Epoxy requires a mechanically profiled surface, typically a Concrete Surface Profile (CSP) of 2 to 3, which looks and feels like coarse sandpaper. This is achieved by shotblasting or diamond grinding, not by acid etching alone. Acid etching, which is still recommended in many DIY guides, does not produce a consistent profile and leaves salt contamination on the surface that interferes with adhesion.
The concrete must reach a minimum of 3,000 PSI compressive strength and the ambient temperature must be above 50°F during application and for 72 hours of curing.
Ceramic and Porcelain Tile: The Full Picture
Ceramic vs. Porcelain: Use Porcelain Below Grade
Ceramic tile has a water absorption rate above 3%. Porcelain tile has a water absorption rate below 0.5%, classified as impervious by the American National Standards Institute (ANSI). In a basement where the slab will cycle through wet and dry conditions, ceramic tile will absorb moisture, expand slightly, and over time this cycling will stress the bond and cause hollow or cracked tiles. Use porcelain exclusively in any below-grade application.
For basement floors specifically, specify a through-body or full-body porcelain, meaning the color and texture run through the full thickness of the tile rather than just the surface glaze. A chip on a glazed tile is immediately visible. On through-body porcelain, surface wear is nearly invisible.
The Thinset Specification
Standard unmodified thinset is designed for above-grade applications on stable substrates. In a below-grade application, use a polymer-modified thinset mortar conforming to ANSI A118.4 or higher. Polymer modification increases bond strength, flexibility, and resistance to the moisture cycling and minor slab movement that basements produce.
Large-format tiles (anything larger than 15×15 inches) require a large and heavy tile (LHT) mortar, which has a higher polymer content and is formulated specifically to support the weight and prevent deflection in larger formats during cure.
The Expansion Joint Failure State
This is where tile failures in basements most commonly originate and is almost never discussed in consumer-facing content.
Concrete slabs move. They expand and contract with temperature change, and below-grade slabs also move slightly as the soil moisture around them changes seasonally. Tile is rigid. If tile is set across a large floor area without soft joints to accommodate that movement, the slab movement transmits stress into the tile field. The result is tent cracking: tiles push against each other and pop up off the substrate along a line, often weeks or months after installation.
The Tile Council of North America (TCNA) specifies that movement accommodation joints (soft joints filled with silicone rather than grout) must be placed at a maximum of 20 to 25 feet in each direction in interior installations, at all changes of plane, and around all fixed objects (columns, floor drains, pipe penetrations). In a typical basement, this means a soft joint somewhere mid-floor if the space is over 20 feet in any direction.
Contractor Warning: Most tile installers skip movement accommodation joints on residential jobs. Ask your installer specifically how they plan to handle expansion joints before they start work. If they cannot cite a TCNA specification or tell you their soft joint interval, get a second quote.
Warmth: The Thermal Reality
Porcelain tile sits directly on a concrete slab that is in direct contact with the ground. Basement slab temperatures typically range from 52°F to 65°F depending on geography and season. Porcelain has a thermal conductivity approximately 6 to 8 times higher than rigid core LVP. This means tile will feel cold to bare feet in any basement application without a dedicated in-floor radiant heat system, regardless of air temperature in the room. This is a physics constraint, not a product quality issue. If thermal comfort is a priority for a living space, LVP provides a meaningfully warmer surface underfoot.
Definitive Recommendation Framework
Answer these four questions in order. Each one routes you to a decision.
Question 1: Do you have any signs of active water intrusion or hydrostatic pressure?
If yes, stop. Correct the water problem first. Exterior grading, downspout extension, perimeter drainage, or exterior waterproofing depending on the source. No flooring product belongs on an actively wet slab.
Question 2: What do your moisture tests show?
- MVER under 3 lbs (F1869) and RH under 75% (F2170): All three materials are viable. Proceed to Question 3.
- MVER 3 to 5 lbs or RH 75% to 85%: LVP with a 6-mil poly vapor barrier is viable. Epoxy is viable with a dedicated moisture vapor barrier primer. Standard tile thinset is not appropriate; use LHT polymer-modified mortar for tile.
- MVER over 5 lbs or RH over 85%: Investigate source. Consider interior drainage before any floor covering.
Question 3: What is the space being used for?
- Finished living space (bedroom, media room, playroom): LVP with 20-mil wear layer and integrated or separate moisture barrier.
- Utility, workshop, or garage-adjacent: Epoxy, full-system (primer, base, topcoat), 100% solids.
- Permanent hard surface, high-traffic, or radiant heat: Porcelain tile with polymer-modified thinset, soft movement joints.
Question 4: What is your flood risk tolerance?
If the space is in a region with a history of basement flooding, or if a sump pump failure would put water on the floor, do not install organic-backed or foam-backed flooring. Rigid core LVP with zero organic content in the backing survives temporary flooding events and can be dried and reinstalled. Epoxy survives flooding at the surface but may delaminate at edges if water sits for extended periods. Porcelain tile survives flooding completely at the tile level; the subfloor bond is the vulnerability.
Summary Specs at a Glance
| Spec | Value |
|---|---|
| Max MVER for most flooring (ASTM F1869) | 3 lbs per 1,000 sq ft per 24 hrs |
| Max internal RH for most flooring (ASTM F2170) | 75% |
| Slab flatness tolerance for LVP/LVT (ASTM F710) | 3/16 inch over 10-foot span |
| Minimum concrete compressive strength | 3,000 PSI |
| Minimum LVP wear layer for regular traffic | 20 mil |
| LVP service temperature range | 55°F to 85°F |
| Vapor barrier spec (separate poly sheet) | 6-mil polyethylene, 8-inch lapped seams, taped |
| Leveling compound type for below-grade | Portland cement-based only (not gypsum) |
| Thinset for below-grade tile | Polymer-modified, ANSI A118.4 or higher |
| Tile movement joints (TCNA) | Max 20 to 25 feet on center in each direction |
